Winning the MaKey MaKey “group how-to” contest – using the MaKey MaKey for custom assistive technology interfaces
In August I learned about a cool contest put on JoyLabz (the folks who make the MaKey MaKey) that asked for submissions for instructions on how to lead a group “how-to” workshop using the MaKey MaKey. For whatever reason, at first glance the contest felt like a long-shot, until I remembered that I had already been planning to use the MaKey MaKey as part of a study in my grad school work applying open-source technology and approaches to the field of assistive technology.
The study ended up not working out, but the ideas were still totally worth pursuing. This led me to pursue the on-going Eyewriter 2.1 open-source eye-tracking system, as well as the openSip+Puff open-source sip-and-puff interface. I knew that the MaKey MaKey provided a unique and hyper-adaptable way for people with even limited technology skills to build customized keyboard and mouse hardware interfaces, so I couldn’t pass up the opportunity to enter the contest and give it a go!
I ended up being one of five winners out of nearly 40 entries, which earned me $1000 and a cool bag of goodies from JoyLabz! The prize will enable me to produce some circuit boards and eventually host a community workshop based on my submission!
The submission
The contest asked for submissions that detail how to lead a group through the process of making a project using the MaKey MaKey, so I created the following submission:
View the contest submission on the MaKey MaKey forums
My submission guides educators or caregivers through the process of assessing the needs and abilities of a young student with some sort of physical disability and making a keyboard/mouse interface that is specifically adapted to them. The interface can be made from very cheap materials like aluminum foil and cardboard and can be positioned or molded to fit the student’s exact needs and abilities.
I also wanted to make sure that the participants understood that by understanding the needs and abilities of their student(s), and using cheap found materials, they could easily create several task-specific interfaces that can be used together or interchangeably to help the student do specific things easily (such as control a slideshow, play a game or create simple music). Each lesson or activity could potentially require different motions and physical expressions from the student, and using the MaKey MaKey makes this trivial and even fun!
For the contest submission I generated the following material, which you can download below or from the forum post.
- Step-by-step guide.pdf – a guided walkthrough of the process of identifying needs and capabilities, then brainstorming a new alternative interface.
- Body mobility chart.pdf – a chart that you can use to make notes of the mobility capabilities of a user, along with difficulty of movement. Used by the Step-by-step guide.
- Example interfaces (low quality).pdf – a compilation of some very crude ideas I came up with to get the educator thinking about how they can use various types of motion as input. I just whipped this up yesterday, so I intend to make much more clear illustrations over the next few weeks before I actually work with the educators personally.
- MaKey MaKey contest source files.zip – all of the original source files for the other attached PDFs. Includes some .docx files and a Photoshop .psd file.
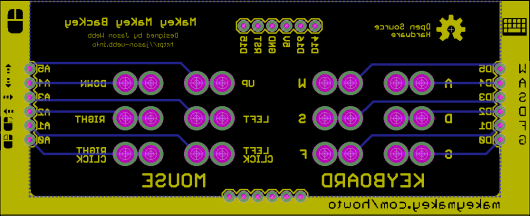
MaKey MaKey backpack circuit board
In addition to the group how-to material I noted that with the cash prize I could produce a limited run of “backpacks” for the MaKey MaKey that break out each of the additional headers on the backside of the board that allow users to access more keyboard buttons and some very useful mouse actions.
Right now you have to plug in wires to each of the headers, which isn’t a big deal for most people with electronics experience, but could be a little confusing for others compared to the simplicity of alligator clip wires. My backpack circuit board would break out each of these headers to pairs of holes so you can continue to use those helpful alligator clip wires!
I have already ordered the first batch of circuit boards through Seeed Studio and expect them to arrive at my doorstep within the next couple days! That means you can expect another blog post very soon about the assembly and use of the boards, and maybe even order one of your own!