Overview of the Eyewriter eye tracking system for educators of students with diverse needs
What is it?
Eyewriter is a low-cost, open-sourceeye tracking system that can be built using off-the-shelf components and free software. For less than $100, the eye movement of an individual with limited mobility can be captured and used as input on a computer to do things like moving the mouse and drawing.
The system was originally developed to help a prominent graffiti artist (Tony Quan, a.k.a. “Tempt1”) regain some creative expression after being fully paralyzed by ALS. As Tony’s family explains, though the technology does exist commercially, it is so expensive that it is all but inaccessible to most individuals who need it.
How does it work?
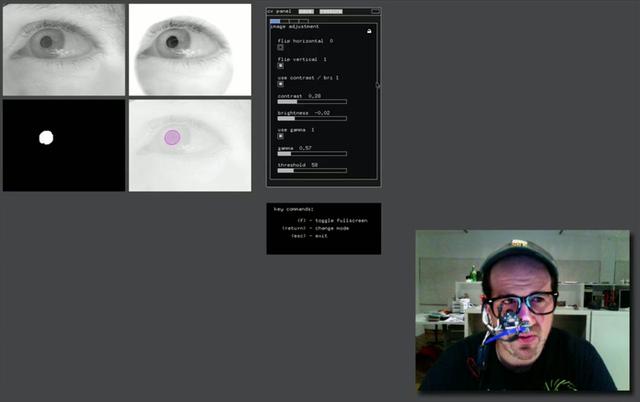 The Eyewriter system uses near-infrared lights to illuminate the user’s eye from different angles and a cheap modified webcam to take photos of the eye many times a second. Free software analyzes these photos and picks out the pupil in each, then translates it’s position into mouse coordinates on the computer. When calibrated correctly, all you have to do is look at the screen where you want some action to occur and the mouse cursor will go there.
What can I use it for?
Eye tracking software such as the Eyewriter is most effective for individuals who have physical limitations that affect fine motor functions or otherwise make it hard to accurately control a mouse. Given access to a fluid method of input to a computer, these individuals can now explore new modes of expression through software.
The original Eyewriter team demonstrated a number of really cool uses for the technology, including tagging buildings with projected graffiti and drawing using industrial robot arms. However, not many people have access to such resources, so I would expect the following uses to be more common:
- Digital drawing and painting using common applications like Photoshop.
- Navigating an otherwise unmodified operating system like Windows or OSX (Mac).
- Gesture-based control of more complex actions. For example, if a user traces a circle with their eye, software could automatically launch their e-mail.
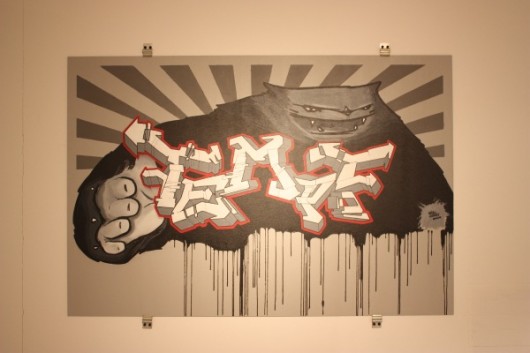
Here is just one example of the work that the graffiti artist Tempt1 was able to create with the help of Eyewriter:
How do I get started?
Unfortunately, the Eyewriter project has not seen any activity in about three years, and was left in a state that is really only accessible with the help of an experienced programmer and and electronics engineer. To get the project to work in it’s current state, you need to compile code from source, solder up a hardware system and hack a camera. This work would take an experienced maker several weeks, and would be pretty unreasonable to expect full-time educators to accomplish on their own.
Therefore, over the next few months (and through the summer), I’ll be re-evaluating the Eyewriter project and finding ways to make it more accessible to educators and their students. I will be posting regular updates about what this involves as it happens, but for now, here’s what I expect to do:
- Update the source code to rely on the newest version of openFrameworks.
- Compile binaries for both Windows and Mac systems so that the users will never have to get into the source code.
- Simplify and integrate the electronics so that the user will only have to deal with a single, fully-assembled unit.
- Create an adjustable 3D-printable housing and mounting system.
- Create and begin selling a low-cost kit so you can build one yourself easily.
- Test prototypes with active art educators.
I will be working on this project throughout the year and sharing all of the design files in a variety of ways. Here are some places to check:
- Source code, circuit board designs and bills of materials will be posted on Github
- Documentation will be posted in a variety of formats, including articles on this blog, step-by-step walkthroughs on Instructables and videos on Vimeo.
- Any 3D-printable design files will be posted through Thingiverse.
- Lots of photos on my Flickr photostream.